
Opt-out from Web Archive
April 29, 2024


Set up the first laboratory on EVE-NG

In the realm of automation, each laboratory we will create requires a feature as basic as it is essential: the IP addresses of the devices must be accessible from the automation system. While the EVE-NG PRO version offers a native feature (NAT Cloud) that simplifies this process, with EVE-NG CE we need to devise a strategy to achieve the same outcome.
Our goal is to configure an additional network on EVE-NG that allows us to connect the management interfaces of the devices we will use for our labs, whether they are virtual (internal to EVE-NG) or physical (PLCs and other external physical devices). The diagram below (attached1) summarizes our objective:
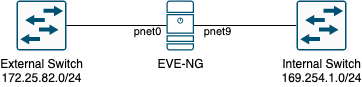
EVE-NG Networking
First and foremost, we need to understand how networking works in EVE-NG, and this provides an opportunity to introduce some Linux concepts in general.
In a Linux system, network interfaces are represented by various names, typically prefixed with “eth” or “ens” followed by an identifier number. These interfaces can represent either physical network cards or virtual network cards. In our environment, we’ll find that the physical network card is represented by eth0, while there are other network cards named pnet.
We can view the network interfaces of the system using one of the following commands:
ifconfig -a
ip link
The configured pnet interfaces are actually virtual switches (bridges) set up by default during installation:
sudo brctl show
bridge name bridge id       STP enabled interfaces
pnet0       8000.0050568a6a54   no      eth0
pnet1       8000.000000000000   no
pnet2       8000.000000000000   no
pnet3       8000.000000000000   no
pnet4       8000.000000000000   no
pnet5       8000.000000000000   no
pnet6       8000.000000000000   no
pnet7       8000.000000000000   no
pnet8       8000.000000000000   no
pnet9       8000.000000000000   no
In particular, we see that the bridge pnet0 is associated with the physical interface eth0. In other words, anything associated with the bridge pnet0 will also be transmitted over the network eth0. As we’ll see in the web interface, we can add Cloud networks. Cloud networks are nothing but the pnet bridges. Specifically, the pnet0 network is also used for web access. In fact, the management IP address is associated with the bridge pnet0, as we can see using one of the following commands:
ifconfig pnet0
ip address show pnet0
We can then configure an IP address on the pnet9 network and connect the management interfaces of the devices to the Cloud9 network.
EVE-NG, che è basata su Ubuntu 20, configura le reti tramite il file /etc/network/interfaces. In particolare dobbiamo configurare la parte relativa al bridge pnet9 come segue:
# Cloud devices
auto pnet9
iface pnet9 inet static
    address 169.254.1.1
    netmask 255.255.255.0
    bridge_ports none
    bridge_stp off
We use the APIPA network, which is defined to be local. In this sense, within an enterprise context, we have a reasonable certainty of not overlapping with other networks. The remaining interfaces pnet2-9 can be deleted.
We can now reload the modified network configuration:
sudo /etc/init.d/networking restart
If we ever want to associate a physical interface with this bridge, we need to add the line:
bridge_ports eth1
Enabling DHCP
For convenience, we choose to automatically assign IP addresses to the network interfaces connected to the Cloud9 network. To do this, we use the DHCP protocol via Dnsmasq.
sudo apt-get update
sudo apt-get install -y dnsmasq
The configuration of Dnsmasq) is done through the configuration file /etc/dnsmasq.conf. Specifically, we want to have only the DHCP service active and only for the network managed by the interface pnet9. The configuration is as follows:
port=0
interface=pnet9
dhcp-range=169.254.1.2,169.254.1.254,3650d
log-dhcp
Finally, restart the service with:
sudo systemctl restart dnsmasq
As we’ll see later for the automation part, we need a stable association between the IP addresses of the devices and the devices themselves. Therefore, we cannot rely on a dynamic mapping provided by Dnsmasq, but we must define it statically. We can map the hostname with which the device will present itself during the DHCP request and statically map it to Dnsmasq:
dhcp-host=SW1,169.254.1.101
dhcp-host=SW2,169.254.1.102
dhcp-host=SW3,169.254.1.103
dhcp-host=SW4,169.254.1.104
The list should be completed with all the names we will use in this and future labs.
Accessing the Internet
To complete our environment, the Cloud9 network must be able to access the Internet. In other words, outgoing traffic must be masked (via NAT) using the IP address configured on the pnet0 interface.
First, we need to enable routing by modifying the file /etc/sysctl.conf:
net.ipv4.ip_forward=1
Enable the setting by executing:
sudo sysctl -p
Then, configure NAT using IPTables to mask outgoing traffic with the address of pnet0:
sudo iptables -t nat -A POSTROUTING -o pnet0 -j MASQUERADE
To save the changes, use:
sudo apt-get install -y iptables-persistent
sudo iptables-save > /etc/iptables/rules.v4
Although not necessary, it’s recommended to reboot the system to ensure everything is configured correctly.
Supported Devices
EVE-NG supports a wide range of devices and is generally capable of running almost any x86-based device. For more information, refer to the Supported images containing the list of supported devices.
For lab portability, and thus for easy lab usage, it’s important to use the correct name. Otherwise, you will need to modify the lab by assigning the correct images before launching it.
Copy the contents of the iol directory to the directory /opt/unetlab/addons/iol. This can be done using PuTTY or WinSCP (Windows) or directly with SSH (Mac):
scp i86bi_linux_l- root@172.25.82.222:/opt/unetlab/addons/iol/bin/
scp iourc root@172.25.82.222:/opt/unetlab/addons/iol/bin/
Then, on the EVE-NG machine, execute:
sudo /opt/unetlab/wrappers/unl_wrapper -a fixpermissions
Creare il primo laboratorio
The final step is to create the first actual laboratory. Connect to the EVE-NG machine via Web by selecting the Html5 console mode at login:
- Go to
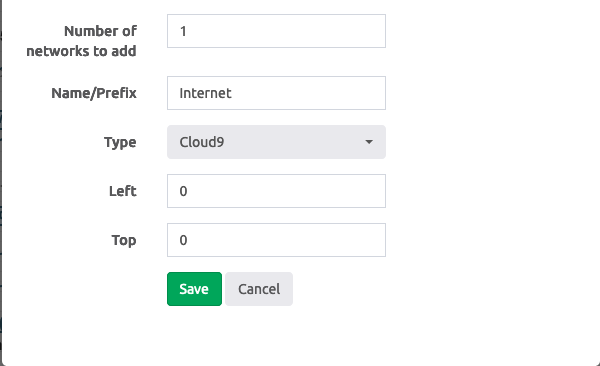
Add new lab; - Add a network by going to
Add an object->Networkon the right
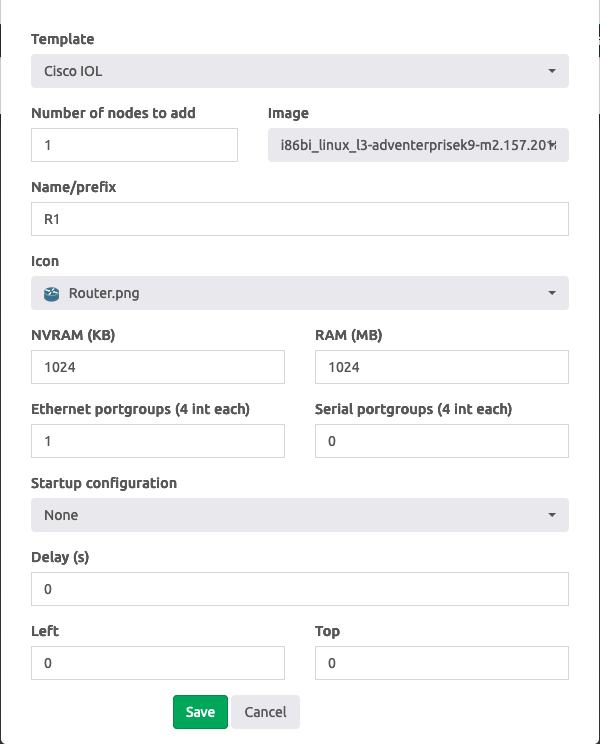
- Add an IOL node by going to
Add an object->Node
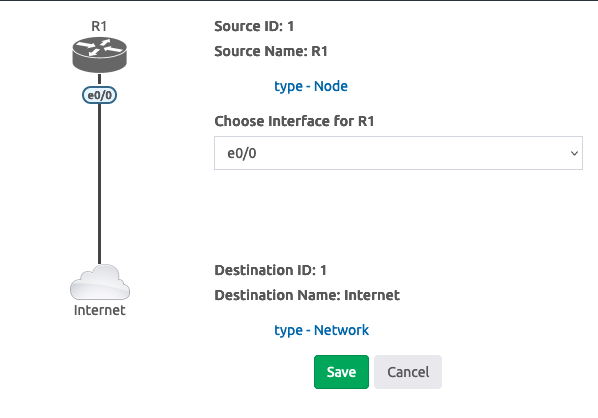
- Connect router R1:e0/0 to the Internet network
- Start router R1 by going to
More actions->Start all nodeson the right
Then, access the console of router R1 and configure it as follows:
username admin privilege 15 password cisco
hostname R1
ip domain-name example.com
interface Ethernet0/0
  ip address dhcp
  no shutdown
crypto key generate rsa modulus 2048
ip ssh version 2
line vty 0 4
  transport input ssh
  login local
If our environment configuration has been done correctly, we should:
- See an IP address configured on R1:e0/0
- Be able to connect to R1 from the EVE-NG machine
When connecting to R1 via SSH, we might encounter the following error:
Unable to negotiate with 169.254.1.186 port 22: no matching key exchange method found. Their offer: diffie-hellman-group-exchange-sha1,diffie-hellman-group14-sha1
The reason is that the image used by R1 is outdated and still uses protocols considered obsolete and insecure. On the EVE-NG machine, we need to enable in the file /root/.ssh/config some obsolete and insecure configurations (to be done in a test environment but not in production):
KexAlgorithms diffie-hellman-group-exchange-sha1,diffie-hellman-group14-sha1,diffie-hellman-group1-sha1
HostKeyAlgorithms ssh-rsa,ssh-dss

Host *
    ServerAliveInterval 5
    ServerAliveCountMax 3
At this point, we should be able to connect to R1 via SSH.
The final test that validates our environment is to ping from R1 to an Internet address, for example, 8.8.8.8:
R1#ping 8.8.8.8
Type escape sequence to abort.
Sending 5, 100-byte ICMP Echos to 8.8.8.8, timeout is 2 seconds:
!!!!!
Success rate is 100 percent (5/5), round-trip min/avg/max = 11/11/12 ms